Simple File Upload: The Easy-To-Use Cloudinary Alternative on Heroku
Cloudinary has remained a popular choice for file handling on Heroku for some time. However, its popularity is diminishing for various reasons.
People are starting to seek Cloudinary alternatives to enhance their experience on Heroku. If you haven't noticed this trend, you might be missing out.
This guide will help you better understand the reality. If you are someone who has been concerned about using Cloudinary for file management in your web app on Heroku, this guide will help you find the missing pieces.
What are the reasons to look for a Cloudinary alternative?
There are many reasons to consider Cloudinary alternatives. Cost efficiency is a primary factor. Although Cloudinary offers a free tier, it is not sufficient for any real-world business and is only suitable for testing projects. Moreover, their credit-based pricing system, which scales up according to project demands, can lead to increased costs.
Another significant issue with Cloudinary is its complexity. If you only need a file uploader and storage service for your service, you shouldn’t have to go through a lot of coding to create and customize the file uploader form.
Moreover, many developers find that supporting multiple file uploads with Cloudinary requires a lot of work. If this is the case for you as well, you should probably look for a Cloudinary alternative that allows you to create a customizable file uploader.
Cloudinary also comes with many extras for different tasks, which can further complicate things. If you only need a simple file upload service, this is another legitimate reason to look for a Cloudinary alternative.
Finally, you might already be facing integration and compatibility issues with other tools and services in the Heroku ecosystem when using Cloudinary. The tool we introduce will likely provide smoother integration compared to Cloudinary with the Heroku system.
Let’s summarize the things you should look for when seeking a Cloudinary alternative for your Heroku apps.
- Easy to install and use
- Supports multiple file uploads at once (automatically)
- Customizable file uploader UI without needing CSS
- No complicated “Extras” (e.g., photo editing that you may not need)
- Transparent, fixed pricing
- A service that offers more streamlined support for Heroku
- Better performance
What is Simple File Upload?
Simple File Upload, as the name suggests, is a simple solution for the complicated challenges that developers face when creating file uploaders. It uses modern cloud technologies to create a highly available and scalable tool for effortless file management. In the market, Simple File Upload positions itself as a user-friendly and efficient alternative to more complex systems like Cloudinary.
This tool is primarily created for web developers, especially those working with cloud platforms like Heroku. You won’t have any trouble using Simple File Upload even if you are an entry-level developer because this tool can manage user-generated content, such as images and documents, without the need for complex backend coding.
Why is Simple File Upload specifically a good solution for Heroku? For developers using Heroku, managing file uploads can be a task that takes a lot of time and requires careful attention to security and storage concerns. Simple File Upload greatly simplifies this process.
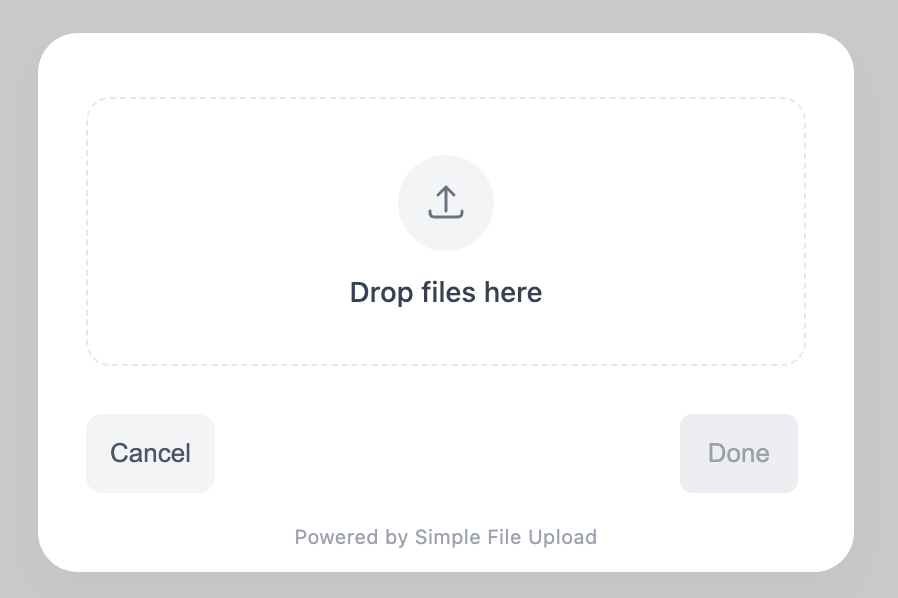
Setting up Simple File Upload on your Heroku web app is easy. You don’t need separate cloud storage because Simple File Upload comes with pre-built S3 storage. You can set up Simple File Upload in four easy steps.
Step 1: Install the Simple File Upload Add-On
First, install the Simple File Upload add-on from the Heroku marketplace, also known as the Heroku Elements page. Then configure it for settings such as whether to allow multiple file uploads, maximum file upload size, types of files to upload, and whether you would like to resize images before uploading.
Step 2: Add the JavaScript
Copy the below javascript into the 'head' of your HTML code.
<script type="module" src="https://cdn.simplefileupload.com/simple-file-upload.latest.js"></script>
Step 3: Add the web component to your page
<simple-file-upload
  public-key= YourPublicKey
></simple-file-upload>
Step 4: Save the Returned File URL to Your Database
When a user uploads a file, the web component automatically emits an event containing the file’s URL. Listen for the event and save the URL to your database so you can access the uploaded file later.
What is Cloudinary?
Cloudinary is a cloud-based service that provides solutions for managing images and videos for web and mobile applications. It supports a wide range of media operations, including the upload, storage, optimization, and delivery of images and videos. One of the key benefits is that it utilizes advanced algorithms to automatically optimize media for faster load times and an improved user experience.
However, the most frustrating aspect of Cloudinary is that, despite its powerful capabilities, integrating it can be a complex process that requires a learning curve for developers. Let's see how to set it up on your Heroku web app.
Step 1: Create a Cloudinary Account
- Go to Cloudinary's website.
- Click on the "Sign Up" button.
- Fill in your details and create an account.
Step 2: Get Your Cloudinary Credentials
- Once logged in, go to the "Dashboard".
- Note down the Cloud Name, API Key, and API Secret. You will need these for your Heroku app.
Step 3: Add Cloudinary to Your Heroku App
- Log into your Heroku dashboard.
- Select the app you want to add Cloudinary to.
- Go to the "Resources" tab in your Heroku app's dashboard.
- Search for the "Cloudinary" add-on in the add-ons search bar.
- Choose the plan for the Cloudinary add-on and add it to your app.
Step 4: Configure Your App with Cloudinary's Credentials
- In your Heroku app settings, click on "Reveal Config Vars".
- Add the Cloud Name, API Key, and API Secret from your Cloudinary dashboard to your Heroku application's configuration variables.
Step 5: Integrate Cloudinary SDK in your app's code
- Install the relevant Cloudinary SDK. For example, to install Python SDK run the following commands.
pip3 install cloudinary
pip3 install python-dotenv
- Create a file named .env within your project and insert your API environment variable acquired from your product environment credentials.
- Create a new file in your project, named my_file.py, and copy-paste the following code

Step 6: Deploy Your Changes
- Push the updated code to your Heroku app.
- Once the app is deployed, your integration with Cloudinary should be live.
As you can see, integrating Cloudinary into your Heroku app requires more steps and is a bit more complicated compared to the ease with which Simple File Upload accomplishes it.
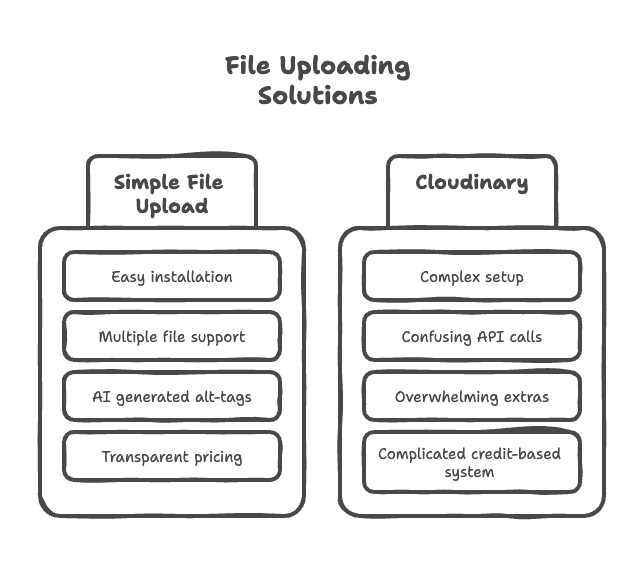
Simple File Upload vs Cloudinary (How Simple File Upload Can Save Your Time and Sanity)
Easy Installation and Use
Simple File Upload is offered as a Heroku add-on, and therefore, the installation can be done directly from the Heroku marketplace. Overall, the installation and configuration process is very intuitive.
Developers just need to insert a single JavaScript snippet into their HTML. Integration into existing projects is smooth as well. There is no requirement for complex backend changes or additional infrastructure setup.
On the other hand, Cloudinary requires developers to sign up for an account, retrieve API keys, and manage more complex configuration settings. As you saw in the above section, the installation process includes more steps, such as configuring environment variables and integrating SDKs into the application. Moreover, integrating Cloudinary into a web application often requires a good understanding of both the service and the application's architecture.
Supports Multiple File Uploads at Once
Simple File Upload is designed to enable multiple file uploads as easily as possible, while Cloudinary requires a more hands-on approach for setup and configuration.
With Simple File Upload, developers can configure the uploader for multiple file uploads simply by including multiple="true".
In Simple File Upload, you can set a limit of up to 50 files to be uploaded simultaneously by adjusting a single setting. The service automatically generates distinct URLs for each uploaded file, which can be retrieved and stored in the database in batches.
Cloudinary supports multiple file uploads, but it requires developers to implement specific API calls or use widgets that are configured for batch uploads. For example, the code sample you would write to enable multiple file uploads in Cloudinary would look like this.

Also, error handling and server load management have to be handled with much care when you work with Cloudinary, while most of it is done automatically when you use Simple File Upload.
No Complicated “Extras”
Simple File Upload is designed with simplicity in mind. There are no additional modules or plugins to install beyond the initial setup, providing a "what you see is what you get" experience. It provides all necessary functionalities for file uploading without overwhelming users with technical choices or setup options that are often not needed for basic to moderate use.
Cloudinary is a feature-rich platform that offers a wide range of functionalities beyond just file uploading. The service includes various add-ons and advanced settings which, while powerful, can be overwhelming for users.
Cloudinary heavily relies on extras, providing options for image manipulation, auto-tagging, SEO optimization, and more. However, another challenge with Extras is that users often have to invest considerable time in reading documentation to fully understand and effectively use the breadth of Cloudinary's offerings.
Transparent, Fixed Pricing
Simple File Upload offers a fixed pricing model, with clear tiers such as "Basic" at $35 per month and "Pro" at $80 per month. There are no hidden costs or overage fees associated with Simple File Upload; “what you see is what you pay”. This service's fixed pricing allows for easier budgeting and financial planning for businesses, as the costs are predictable each month. With Simple File Upload, there is no need to monitor usage to avoid exceeding a credit limit or incurring additional costs.
Cloudinary uses a credit-based system where services consume credits, and the plans, like "Advanced" at $224 per month and "Plus" at $89 per month, provide a certain number of credits monthly.
Using a credit system can get complicated because various tasks use up different amounts of credits. This means you'll need to keep an eye on how many credits you're using all the time. Also, your costs could change from month to month, especially if you go over your credit limit. If you often use more credits than your plan allows, you might have to move to a more expensive plan, which could cost more over time.
Overall, Simple File Upload's pricing is more customer-friendly due to its fixed nature. With fixed pricing, businesses are protected from unexpected surges in costs, unlike a credit system where increased usage can lead to higher expenses. Moreover, it’s easier to understand at a glance.
If I didn’t mention the obvious, as you can clearly see from the numbers, Simple File Upload is much more affordable than Cloudinary's services. Why pay more, especially when Simple File Upload provides all the necessary services and is easier to use? This ease of use can also reduce costs for developers which would save you more money.
Let's summarize the above comparison between Cloudinary and Simple File Upload.
The Simple Alternative to Cloudinary
Cloudinary is a widely recognized file management tool in the industry, often chosen as the first choice by many. However, in the long run, most realize that Cloudinary may not be the best tool to meet their needs. This is where companies start to find a Cloudinary alternative.
Simple File Upload outperforms Cloudinary in many aspects. Whether you're looking for a straightforward pricing model, an easy-to-use file uploader, or a solution capable of handling multiple files effortlessly, Simple File Upload is the ideal choice.
Another thing to consider is the particular advantages it offers for Heroku apps. Managing files on Heroku file storage can be challenging due to its architecture, but Simple File Upload simplifies this by directly uploading files to a prebuilt S3 setup from the user's browser. Therefore, you don’t have to go through the lengthy and cumbersome process of setting up S3.
At this point, if you're considering trying Simple File Upload, sign up and take advantage of our
Ready to simplify uploads?
Join thousands of developers who trust Simple File Upload for seamless integration.