The Easiest Workaround to Heroku Storage
Have you ever struggled with Heroku's file storage limits and wondered if there's an easy way around it? You're in the right place if you're a developer wrestling with Heroku's file system.
It's important to note that Heroku uses an ephemeral file system. This means that the Heroku file system is not permanent. As a result, your web app files will disappear unless you store them elsewhere. In this article, we'll introduce Simple File Upload, a practical solution to Heroku's ephemeral file system.
We'll break down the basics of Heroku storage. First, what exactly is Heroku storage, and how does it impact your app's files? We'll also discuss Heroku dynos and why they matter in storage. We'll show you how to use Simple File Upload with Heroku storage to keep your app's files safe and secure.
As we move forward, we'll share some useful tips for making the most of file storage on Heroku. If you're ready to simplify your app's file storage and management on Heroku, let's dive in!
What is Heroku Storage?
Heroku's storage revolves around the concept of an ephemeral file system. The term "ephemeral" denotes transience or impermanence. The file system is ephemeral because it is not persistent across dynos or application restarts.
Developers must recognize that any data written to the local file system on a Heroku dyno is short-lived. When Heroku restart dyno, the file system reverts to its initial state. Moreover, it erases any modifications.
This ephemeral nature carries implications for data durability and long-term storage. It is important to store data in external databases or cloud storage services. In other words, we must not only rely on the local file system.
For developers, understanding the ephemeral file system is essential for maintaining data integrity. Besides, it also helps us ensure proper application behavior. Developers must design their applications to handle data storage in a way that aligns with Heroku's architecture. This necessitates the usage of external storage solutions for persistent data.
On Heroku, data developers can store on the ephemeral file system including:
- Temporary files
- Cache data
- Other non-persistent information.
This file system is designed for transient storage, serving as a short-term solution for dynamic data. However, it's crucial to emphasize that any data stored on the ephemeral file system becomes inaccessible. Moreover, it is permanently lost when a dyno restarts.
For critical and persistent data, developers must store it externally, utilizing Heroku's add-ons. This ensures the preservation of essential information even in the face of dyno restarts.
The two most effective solutions to Heroku’s ephemeral system are:
Heroku Postgres. Heroku Postgres is a fully managed relational database service that seamlessly integrates with Heroku. Moreover, it offers scalable, high-performance PostgreSQL databases for data storage and retrieval.
Cloud-Based Object Storage. Cloud-based object storage provides scalable and durable storage for unstructured data. Examples include Amazon S3, Google Cloud Storage, and Azure Blob Storage. They allow developers to store and retrieve large volumes of data efficiently. Simple File Upload included cloud-based object storage for free to all users.
The above solutions help us ensure data durability and consistency. Now, let’s cover some details about Heroku dynos.
What is a Heroku Dyno?
A Heroku dyno is a lightweight, containerized, and virtualized environment. It is important to note that dyno helps applications run on the Heroku platform. It serves as the basic unit of computation and scaling on Heroku.
Dynos encapsulate an application's code and dependencies. Therefore, we can easily enable seamless deployment and scaling. Dynos operate based on a process model, with each dyno running a single process.
Heroku automatically restarts dynos at least once daily to ensure system reliability and to apply any pending updates. As a result, the web data is lost permanently. Developers can scale their applications horizontally by adding more dynos. Moreover, it can also help developers enhance performance and responsiveness.
✔️ For developers, understanding dyno mechanics is important for optimizing resource utilization and crafting efficient, scalable Heroku applications.
Upload Files Directly to Your Heroku Web App with Simple File Upload (increasing the speed, reliability, and security of your app)
Simple File Upload offers a seamless and efficient solution for handling file uploads in Heroku web apps. It is designed as a Heroku add-on, so you can add it to your web app directly from the Heroku elements page.
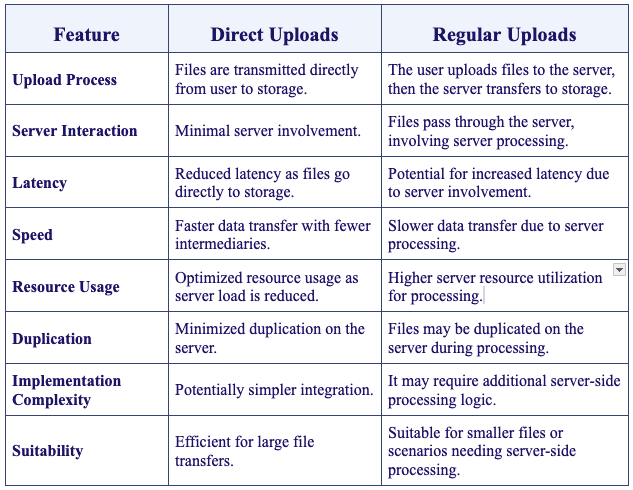
One of its key advantages is that it uses direct uploads. Direct uploads ensure that the files are sent directly from the user's browser to secure cloud storage. This speeds up the upload process and offloads the burden of storing static files in your app. It is a scalable and resource-efficient solution.
Direct file uploads transmit files directly from a user's device to a designated storage system. Moreover, direct uploads bypass the need to route through an intermediate server. This method differs significantly from "regular" uploads. In regular uploads, files are first sent to the server before being transferred to storage.
What are the benefits of direct uploads with Simple File Upload?
Lightening Fast Upload Speeds. By reducing server interaction, direct uploads significantly accelerate the upload process. As a result, Simple File Upload will help improve the overall speed and responsiveness of your web app.
Streamlined, Simple Upload Process. With direct uploads, the process is streamlined. Just select your file and upload it directly to where it needs to go. It's hassle-free, with no complicated steps.
Efficient Space-Optimized Uploads. Direct uploads with Simple File Upload prevent unnecessary duplication and storage of files on the server. As a result, it optimizes resource usage.
Reliable File Uploads. Direct uploads provide a more stable connection. This reduces the chances of errors or interruptions during the upload process. You can trust that your files will upload smoothly, giving you peace of mind.
Safe and Secure File Delivery. When you use direct uploads, your files are less exposed to potential security risks. They travel a shorter path, reducing the chances of unauthorized access. This keeps your sensitive data safer.
Bandwidth Optimization. By uploading directly, you're likely to use less bandwidth compared to regular uploads that might require multiple steps. This is especially beneficial if you're working with limited internet resources.
Real-time Progress Tracking. Your users can watch the progress of their uploads in real-time. This feature keeps your users informed and in control.
✔️ Simple File Upload ensures peace of mind - your files are securely stored in cloud storage, bypassing Heroku's ephemeral system.
Build a File Uploader with Amazon S3 Storage From Scratch (headache included separately)
Building a file uploader for a web app can be a simple process with the right tool. However, when you are building a file uploader integrated with Amazon S3 on the backend from scratch, it can be a complicated, frustrating process.
Below, we'll walkthrough the complexities of building a file uploader from scratch. Then, we'll show you how to do it with Simple File Upload in less than five minutes.
HTML Setup
Start by creating a basic HTML structure that includes a file input element. This step serves as the user interface for selecting files. Despite its apparent simplicity, handling user input and ensuring compatibility across different browsers can be time-consuming.
.png)
Javascript Implementation
Introduce Javascript to manage user interactions and initiate the file upload process. This step involves:
- Creating an event listener to capture file selections.
- Constructing an XMLHttpRequest object to facilitate communication between the front and back end.
- Handling the asynchronous nature of file uploads.
- Debugging potential issues with cross-browser compatibility and unexpected user behaviors.
.png)
Backend Integration with Amazon S3 Storage
Setting up the backend integration with Amazon S3 Storage introduces complexities related to configuring the S3 bucket. This step requires meticulous attention to the following:
- S3 bucket permissions
- CORS (Cross-Origin Resource Sharing) configurations
- Security considerations.
Below is an overview of the steps to setup the backend integration with Amazon S3 Storage. For detailed instructions, see our article on Rails file uploads that includes step-by-step instructions for configuring Amazon S3.
Create an AWS (Amazon Web Services) Account
- Create an AWS Account.
- Setup your billing preferences.
- Configure the necessary security settings.
Create an Amazon S3 Bucket
- Log on to your AWS Management Console.
- Navigate to S3 and create a new bucket.
- Configure settings such as region and versioning.
Set Up IAM Credentials
- Access the IAM dashboard in AWS.
- Create a new user with S3 access.
- Obtain the access key ID and secret access key.
Configure Bucket Permissions
- Define bucket policies to control access.
- Set up Cross-Origin Resource Sharing (CORS) policies for cross-origin resource sharing.
App Configuration
- Set up environment variables for AWS credentials.
- Build pre-signed upload URLs for secure file uploads.
Javascript for Direct Uploads
- Configure your app for direct uploads using JavaScript.
- Implement functionality to interact with S3 from the client side.
Test and Debug
- Test file uploads to ensure proper integration.
- Debug and troubleshoot any issues encountered during the process.
Documentation and Monitoring
- Document the S3 integration process for future reference.
- Implement monitoring for S3-related activities to ensure smooth operations.
❌ Setting up Amazon S3 Storage can be time-consuming and challenging for those unfamiliar with AWS configurations.
Phew. The complications of setting up Amazon S3 Storage highlight the need for a simpler alternative. Simple File Upload emerges as a user-friendly solution. It provides users with a prebuilt, customizable file uploader and free cloud storage.
Users can seamlessly add a file uploader with cloud storage to their web app without the hassle of navigating through the intricate setup process of Amazon S3. Keep reading to learn how to add Simple File Upload to your web app in four easy steps.
Add Simple File Upload to Your Heroku Web App in Less Than Five Minutes (without setting up and maintaining complicated cloud storage)
We've reviewed how complicated it is to create a file uploader with Amazon S3 Storage. Now, let's learn how you can skip the headache and add Simple File Upload to your web app in less than five minutes. Remember, Simple File Upload is designed as a Heroku add-on, so you can add it to your web app directly from the Heroku elements page.
- Configure your file uploader following our simple step-by-step instructions.
- Add the provided JavaScript snippet to the 'head' of your app.
- Add web component javascript wherever you want the uploader to appear.
That's it! Cloud storage is included for free for all users, so no need to set up your own separate cloud storage account. It's just simple, painless file uploading.
✔️ Unlike the complex process of setting up traditional cloud storage, Simple File Upload offers a streamlined and efficient solution for enabling file uploads to your web app.
Safe and Secure Heroku File Uploads with Simple File Upload
In this article, we explored the nuances of Heroku's ephemeral file system and introduced Simple File Upload as a viable solution to overcome its limitations. We started with the basics of Heroku storage and Heroku dynos.
We then discussed the benefits of direct uploads. We compared the frustrations of building your own file uploader with Amazon S3 Storage compared to the ease of using Simple File Upload.
If you've been struggling with Heroku's file storage limits, we hope this article has shown a way to simplify and enhance your app's file storage and management. With these insights and tools, you're now well-equipped to handle file storage on Heroku with confidence and ease.
Want to enhance your Heroku storage today? Try Simple File Upload for free!
FAQs
Why is understanding Heroku’s ephemeral file system important for developers?
It's important for developers to understand Heroku's ephemeral file system because any changes made during runtime are not persistent on Heroku storage.
This means that developers need to build applications that include:
- Data persistence
- External storage solutions
- Stateless application design
- Performance optimization
- Compliance and security
What's the difference between direct uploads and regular uploads? Why are direct uploads advantageous?
Direct file upload differs from regular server-side uploads by allowing files to be sent directly to cloud storage. Direct file uploads don't pass through the server. In traditional uploads, files are sent to the server. These files consume server resources and potentially cause delays. Direct file uploads reduces server load, improves speed, and enhances user experience.
This approach is advantageous for:
- Scalability
- Reduced server-side processing
- Efficient handling of large files in web applications.
Why should I consider using Simple File Upload instead of building my own file uploader and setting up Amazon S3 storage?
Simple File Upload is quick to install, easy to integrate with your web app, and completely customizable. On the other hand, building your own file uploader with Amazon S3 storage is a complicated process that requires extra time and effort that you could be spending building your app.
Ready to simplify uploads?
Join thousands of developers who trust Simple File Upload for seamless integration.